Sunday, February 27, 2011

Wooden Plank Wall Quotes

While I was picking up some supplies for another project I was currently working on at my local trusty Lowes, I found some amazing Pine planks on sale for just a buck!  Now when anything is just a buck, I simply cannot resist.  Being my crafty self I knew I could turn them into something sweet, and this is what I came up with:

I love wall quotes, but I am not so sure about the ones you just rub onto your wall.  I need something with a little more substance.  I used supplies that I already had so this project didn't cost me anything extra other than the wood, so that means only A DOLLAR, awesome I know.  And its easy as pie...even though pie isn't that easy to make :/
What you'll need:
1 wooden plank - your choice of type and size
3 to 4 paint colors - your choice
scrap matboard or thin cardboard
Mod Podge
Hot Glue
Paintbrushes, large and small

First you are going to need to choose what you want your wall quote to say.  I chose a quote from The Beatles, "All you need is love, love is all you need".  Paint your wooden plank your first paint color.  This is going to be the color that 'peeks' through the top paint color.  Allow the paint to completely dry, you don't want it to mix with your top paint color.
While my paint was drying I chose which word I wanted to stand out, Love of course!  I drew each letter (you can stencil if you like) and then cut them out of scrap cardboard aka an empty Budlight 12 pack box.  I then mod podged each letter to my fabric, and cut around each letter leaving about a half inch of space.  Next I mod podged the fabric edges to the back of each letter and then set out to dry. When that dries (takes about 5-10 minutes) flip your letters over and do a thin layer of mod podge the front.
While my letters were drying I went back to my plank and painted the second color over the first, but this time very lightly.  You dont want the second color to be too thick, leave some of the bottom color showing through. 
I decided to use a third color to make it look even more aged, the blue was too bright for me.  I took a thinned brown paint with a little gold mixed in and did an even thinner coat, but you can choose to only use two.  Allow your paint to dry.  (Don't mind the junk, I live in a very small student apartment...They don't leave much room for crafting!)
After you have your plank looking the way you want it take your dried mod podged letters and place them whichever way you please.  From there you can tell where the rest of your quote needs to be spaced.  I decided to just paint on the rest in my own handwriting but you could use stencils if you like.  I then hot glued my letters on to the planks.  Finito!  
I attached some frame hooks on to the back for easy hanging, whatever works for you.  I plan to hang them over our headboard as soon as we have our new (BIGGER) apartment this May.  Pretty cool for only a buck if I do say so myself!
What do you think?? If you try this, please link it back to me, I would love to see it!
Linking up to:

Thursday, February 24, 2011

Throwback Reflections

I have been wanting to do a post about my Aunt Nancy and cousin Megan's company and all the AWESOME stuff they do, so here it is!  Their business is called "Throwback Reflections".  They do a lot of cool stuff with antiques but probably the most awesome stuff they do is the decoupaged suitcases they make.  These things are SO cool!
Megan restores vintage suitcases and uses vintage cartoons and photos to decorate the exterior of them.  Here are some photos of some of the previous ones she has done and sold....
 Spiderman!  Love this!
 I loved these books as a child, Dr. Suess and Raggety Ann bring back good memories.  I still even have my old raggety doll!
 Charlie Brown & The Lady and the Tramp
She is so talented right?  Someday I will have her make me a super cool one, mabe little mermaid or 101 dalmatians? I was obsessed with those movies when I was a kid.  Im still dying to get a Dal, but Spence says not until we have more room :( Megan is still creating some of these wonderful suitcases, here are two that she is working on right now and will be available to purchase...
 "These pictures are from a children's book from sometime between the 1920s and 1940s. The illustrator is Hank Hart. I LOVE his work and it can be pretty hard to find. These are reproductions that I made so I didn't have to rip my book apart." - Megan
Megan is also working on this Raggedy Ann and Andy case from vintage Johnny Gruelle books. These are from the same time period.

Nancy and Megan have an etsy site where you can find more stuff by them HERE !!! CHECK IT OUT!
Comments are always loved :)
Linking up to:

Tuesday, February 22, 2011

Garage Sale Gems & Funkified Bookcases

When I was looking for furniture to fill my apartment this past summer I quickly realized how expensive it all was going to be.  There was no way I could afford to spend $500 dollars on a kitchen table and chairs let alone even $100!  There is a lot of truth to the title "broke college student"!  So thrift stores and garage sales became my only option and my new best friend.  Since a young age, my mom has passed on the love for both and of course tagged along on our many 'thrifty' excursions!  Good mother-daughter bonding time :) 

My first find of the summer was this gem, oh how I love thee!


It was at a moving sale of this single retired teacher of 30 some years.  She was such a sweetheart, I really enjoyed talking to her.  For some reason people have the tendency to tell me their life stories within the first 10 minutes of meeting me, I seem to have a "I will listen to absolutely anything you have to say" sign flashing on my forehead.  This old trunk was originally her fathers and is from the early 20's.  It's a little rusty and beat up but that is why I love it so much, so much character!  I use it as a coffee table in my living room.  It makes for a great conversation piece!

My second great find of the summer was this pretty basic round table and four chair set.  It was originally this nasty light brown color and pretty scratched up but other than the cosmetics it was in pretty awesome shape!  I found it at Goodwill.  The manager said she didn't have any room for it and just wanted to get rid of it so she gave it to me for an amazing $20 bucks!! YES!  It originally looked something like this:  (I forgot to take before pictures of all of these projects but I found ones that are almost exact)
http://theplacefurnituregalleries.com/media/catalog/product/cache/1/small_image/350x282/5e06319eda06f020e43594a9c230972d/o/v/oval_1.jpg
I sanded all the chairs and table down and then painted them a semi-gloss black.  I found the super cute chair cushions at World Market on sale for $8 a piece.  I am not totally finished with them yet though, this coming summer I would like to paint them in a antiqued white and then sand them down for a distressed look.
And my last but not least find (well for this post anyway) was just a plain old bookcase.  Boring? Of course not!  I LOVE bookcases.  I'm not sure why but I just love the look of them displaying all things adorable.  I found mine at a local thrift store called The Red Barn for just $6 dollars.  It originally looked something like this:  but grosser...if grosser is a word.
 image 2216645699-3
Similar to my table and chairs it was also a nasty light brown color so I also sanded and painted it black to match my dining set (I will eventually distress the same too).  I thought it needed some pizazz, and then it hit me! Re-purpose the back!!  It was gross and falling apart anyway so I ripped that sucker off.  I went to my local Walmart (they seem to have the best fabric prices) and found this fun geometric print.  Starting from one end I slowly stretched and stapled the fabric to the back of the bookcase until covering the entire thing.  I cut off the excess and whalah!  I LOVE it!  I used some of the left over fabric to make matching couch pillows, so coordinating I know :)
The only down side is that it does not make for a very sturdy back to the bookcase.  Mine is pressed straight up against a wall so it doesn't really matter or bother me, the thing is a beast and isn't going anywhere I'm sure.
Have any of you ever done something like this?  Let me know!

Sunday, February 20, 2011

Easy Thai Coconut Soup - Tom Ka Gai

When I was 14 was the first time I traveled to Thailand and I absolutely fell in love.  I was lucky enough to return for a second trip when I was 17 and I can't wait for the next.  One of the best things about Thailand, or Southeast Asia in general, is the food.  I know when you think Asian food most Americans immediately think sweet and sour chicken, tofu, or sushi.  Thai food is none of these.  I think it is a fabulous combination of all things great about food.  You get all the best vegetables, lots of fresh fruit, steamed noodles, and simple chicken and seafood dishes with a twist.  I could go on and on about how much I love Thai food but none of that would do any good if you never try it!  Thai is quickly becoming more and more popular in the U.S., especially in the Midwest, East coast, and West coast states.  If you look on Restaurant.com I am sure you can find one nearby and check it out!  Don't be shy to ask questions and I am sure you will not be disappointed.
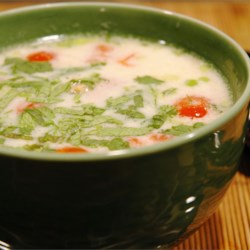
Now for those of you who already know and love Thai or are feeling a little more adventurous here is an amazing Thai recipe.  I am a big fan of coconut and lime and this soup completely embodies that.  I get cravings for this at least once a week, and once you try it I am sure you will too!  It takes less than a half an hour and can feed up to six, depending on how big your serving sizes are.
 
What you will need to make Tom Ka Gai:
1 handful of Thai rice noodles -optional
3/4 lb boneless skinless chicken breast
1/2 lb of tailless/deveined uncooked shrimp - Optional
3 tbsp of vegetable oil (can substitute with evoo)
2 14oz cans of coconut milk
2 cups of water
2 tbsp of minced fresh ginger or 1tbsp of dried ginger
4 tbsp of fish sauce
1/4 cup of lime juice - add more to taste
1 tbsp of red curry paste
handful of shitake mushrooms
6 cherry tomatoes - quartered 
2 green onions -sliced
1 tbsp of fresh cilantro - add more to taste
Noodles :  To start you want to cook the noodles.  Bring a pan of water to a boil and add the rice noodles.  Cook for 3-5 minutes or until tender.  Do not cook too long or the noodles will become gummy.  Drain the water, cover, and set noodles aside.

Soup:   
1.  Cut chicken into thin strips and saute in oil with the tomatoes and mushrooms for to 2 to 3 minutes until the chicken turns white. 
2.  In a pot, bring coconut milk and water to a boil. Reduce heat. Add ginger, fish sauce, lime juice, and red curry paste and stir. Simmer until the chicken is done, 10 to 15 minutes. If adding shrimp, rinse them first in cold water and then add to the soup in the last 2-3 minutes, just enough time to turn them pink.
3.  Add your noodles (if made) to the soup and stir them in.
4.  Sprinkle with scallions and fresh cilantro and serve steaming hot.

Extra tips!
For a sweeter more authentic taste, instead of water use chicken broth with a tbsp of sugar.  This creates a sweeter taste that I like but it is not necessary.  I don't put this in the recipe because it cuts down on cost.

I hope some of you try this and enjoy it as much as I do.  

Do any of you love Thai food too?  Have any good recipes or Thai experiences?  Let me know!

Saturday, February 19, 2011

Life, Crafts, Whatever Giveaway!

So today is Saturday and unfortunately I am feeling a bit under the weather today :( Which means probably no new crafty things will arise out of this day, bummer I know.  But of course as I refuse to get out of my fiance's comfy and warm water bed, I still can at least do a little blogging!

One of my favorite crafty bloggers is having a giveaway!  I did a post about Jen not too long ago and I am currently in the middle of recreating one of her original projects.  She now has reached 250 followers and is doing a giveaway of one of her other projects...

Super cute right!?  The winner gets a recreation with the word/s and colors of your choice.  I definitely recommend checking out her site.  Have a lovely weekend!
Life, Crafts and Whatever

Friday, February 18, 2011

Bee Friendly Friday Follow!

Today is a "Bee Friendly Friday Follow"...and please be friendly and follow my little blog :)
Click the link to join in on the fun! 
Family and Life in Las Vegas


BoostMyBlogFriday

Thursday, February 17, 2011

Clutch Purse

Hello all you lovely readers!

Since I am planning my wedding this upcoming summer I have been busy crafting up as much as possible.  I really want the entire day to just scream Spencer and I.  For my latest project I sewed some cute little sashes for my flower girl and mini bridesmaid.  I am pretty much obsessed with anything Liberty print so I of course had to use the super cute orange, cream and green print I found at JoAnn's the other day.  It was on sale and there was only just over a yard left on the roll so I picked up up for a mere 5 bucks, steal of the day!  It didn't take hardly any fabric to make the sashes so with all of my remnants I was thinking and thinking of what to make with it and then it hit me...matching wedding clutch!  YES.

I did some internet surfing to get some inspiration photos, something like this... 
This project only cost me about 5 dollars!
The materials that you will need:
1 2mm Foamies Sheet in white - .99 cents
7''x36'' piece of fabric (your choice print) $2
Sewing machine or needle and thread for hand stiching (I hand stitched, I like the messy look) I already had these
1 cute button - larger sized $2

Start off by cutting your fabric to the size you want, if you want a smaller clutch, use less than 36'' length or 7'' width.  Fold the fabric in half with the face of the fabric or the 'good side' on the inside of the fold and iron to give you a good seam and stiffer fabric that is easier to work with.  

Sew or stitch up the two length sides leaving the one short width end open.  Now that it is like a large tube, turn the fabric inside out so that the face of the fabric is now on the outside.  However large you decided to make your clutch, cut the Foamie sheet to size and slide it into your your 'tube' leaving about a half of inch of fabric on the open end. Then fold each side of the open end of the fabric in and sew/ stitch shut. 

Decide how you want your clutch to fold shut,  you can fold it into thirds giving you one flap to shut or you can fold it completely in half and then fold both sides over.  I decided to do the first style like the picture above.  The picture below is an example of the second option.
  Once you have made your folds sew/stitch up the sides, whether half or all the way up depending on what style you choose.  Once again turn your clutch inside out so the stiching is on the inside.  All that is left is to add button and loop.  There are a lot of ways to do this but I just wanted mine to be quite simple.  Using a piece of fabric, ribbon, or yarn attach a loop on the inside of the flap and a button on the outside.  

Now whalah!  So cute right?  When making your clutch you do not have to use the Foamie sheet you can instead use a thicker fabric.  I wanted mine to hold shape even when not much was in it so the Foamie sheet was my solution.  Now I have a super cute clutch to hold all of my 'rescue' supplies on the big day that works as an extra matching accessory!
Opinions are appreciated!  
Linking up to!


Related Posts Plugin for WordPress, Blogger...